Why does my Zebra scanner scan, but the form won’t move?
You pull the trigger, the laser fires, the barcode reads, and the SKU lands in the input field — and then nothing happens. The cursor sits there. You have to reach up, tap Submit, and only then does the pick advance. Multiply that by every pick on every order all day and the scanner stops feeling like a scanner.
The fix is one setting deep inside Zebra’s DataWedge configuration: tell DataWedge to send an Enter key (carriage return) after every successful scan. Once that suffix is set, each scan auto-submits the form, and your handheld starts behaving like a true one-trigger workflow. This guide walks you through that setup end to end on a Zebra Android device (TC21, TC22, TC52, TC57, MC33, and the rest of the TC- and MC-series family).
Allow about 10 minutes. You’ll need the handheld and a barcode to test with — any printed SKU or location label from Ordovee works.
What DataWedge actually does
DataWedge is the Zebra app that sits between the scan engine and whatever app you’re using — in your case, the browser running Ordovee. When you pull the trigger, DataWedge decodes the barcode, formats the output, and types the result into the active text field as if you’d typed it on a keyboard.
That last part is the important one. DataWedge isn’t sending data through ODV — it’s typing keystrokes into the focused input. Which means everything ODV needs is configurable through DataWedge itself, including the Enter keystroke that tells the form “I’m done, submit me.”
Step 1: open DataWedge and pick a profile
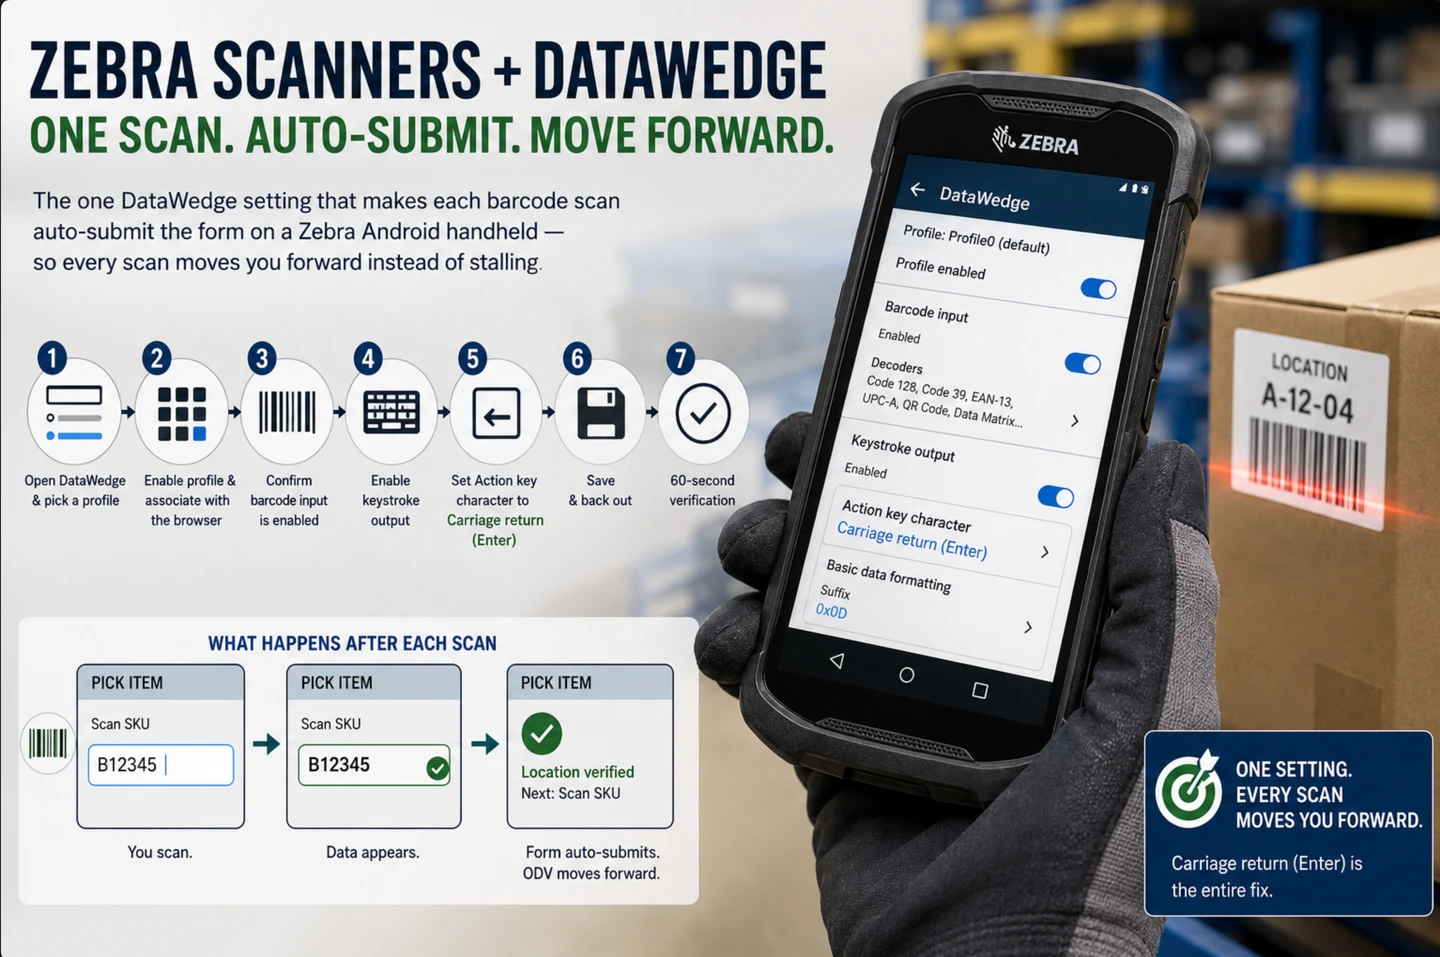
On the Zebra handheld, swipe up to the app drawer and open DataWedge. You’ll see a list of profiles. Most devices ship with a Profile0 (default) that applies to every app unless something more specific is matched. (The left panel of the composite image further down shows what this list looks like.)
You have two options:
- Edit
Profile0 (default). Fastest path. Every app on the device gets the same scanner behavior, including Ordovee in the browser. Good choice if this handheld is dedicated to ODV work. - Create a new profile named
ODV. A little cleaner if the device also runs other apps that need different scanner behavior. Tap the + icon, name itODV, and we’ll associate it with the browser in the next step.
For a dedicated handheld, editing Profile0 is the simpler route and is what we’ll show in the rest of this walkthrough. If you create a new profile, every step below applies to that profile instead.
Step 2: enable the profile and associate it with the browser
Open the profile you’re configuring. At the top, make sure Profile enabled is checked.
Scroll to Associated apps. If you’re editing Profile0 (default), the profile already applies to all apps and you can skip this step. If you created a new ODV profile, tap Associated apps, then the + icon, then add your browser:
- Chrome:
com.android.chrome - Chrome on newer Zebra builds:
com.google.android.chrome - Zebra Enterprise Browser (if installed):
com.symbol.enterprisebrowser
Add the package only — leave the activity field set to * so any screen inside the browser triggers the profile.
Step 3: confirm barcode input is enabled
Back in the profile, find Barcode input. Make sure the toggle at the top of that section reads Enabled.
Tap into Decoders and confirm the symbologies you actually scan are on. The default Zebra preset turns on the common ones — Code 128, Code 39, EAN-13, UPC-A, QR Code, Data Matrix — which covers everything Ordovee generates for SKU labels, location labels, and packing-slip QR codes. There’s no harm in leaving extra decoders enabled; the scanner ignores formats it doesn’t see.
Step 4: enable keystroke output
Scroll down to Keystroke output. This is what types scanned data into the focused field. Make sure the toggle at the top of the section is Enabled.
The default delivery method (Inject via Android API on modern DataWedge builds) works for Ordovee in the browser — no changes needed there.
Step 5: how do you make a Zebra scanner press Enter after each scan?
Set Action key character to Carriage return — that’s the whole fix, and it’s the step that turns scanning into a one-trigger workflow. Still inside Keystroke output, find Action key character. Tap it. A small dialog opens with four choices:
- None
- Tab
- Line feed
- Carriage return ← pick this one.
Once Carriage return is selected, every successful scan ends with an Enter keystroke, which submits the form on Ordovee screens that listen for it. That single dropdown choice is the entire fix.
If your DataWedge version doesn’t show an Action key character option (older builds), the same result is available in Basic Data Formatting further down the profile — either toggle Send ENTER key ON, or type 0x0D into the Suffix field. Pick one path; don’t combine them or every scan will fire two Enter keystrokes and the form will skip ahead.
Step 6: save and back out
DataWedge saves the profile automatically as you exit. Tap the back arrow until you’re out of the profile and back at the DataWedge home. Nothing else to confirm — the profile is live the moment you leave the screen.
See the picking workflow this setup unlocks → Scanner-First Picking on the Warehouse Floor
Step 7: the 60-second verification
Time to make sure the configuration works. Open Ordovee on the handheld and head into a screen with a scan field — picking is the easiest one to test.
- Open ODV in the browser. Sign in if you aren’t already.
- Tap into Picking and start a session, or resume an existing one until you reach a scan prompt.
- Aim the scanner at any ODV barcode — a printed SKU label, a location code, or a packing-slip QR.
- Pull the trigger once.
What should happen:
- The SKU or location code appears in the input field for a fraction of a second.
- The form auto-submits without you touching the screen.
- ODV advances to the next step (location verified, SKU verified, or whatever the screen expects next).
If the form advances on its own, you’re done. If the value lands in the field but the form sits waiting, head back to Step 5 — that’s almost always where the Enter suffix was missed.
Where this setup pays off in Ordovee
Once the Enter suffix is in place, every scan-driven screen in ODV becomes a true one-trigger interaction. The biggest wins:
- Picking — the three-scan verification flow (location → SKU → cart bin) becomes three trigger pulls with no taps in between. See Scanner-First Picking for the full walkthrough.
- Location scanning — scanning a location label during a lookup or cycle count submits immediately, so the location detail loads without a screen tap.
- Cycle counts — verifying bin contents one SKU at a time. Each scan logs the count and queues the next entry.
- SKU lookup — scan any ODV label to jump straight to the item detail page. Useful at a packing station or when answering “do we have this?” on the floor.
- Scan-to-add inventory — receiving new stock by scanning the SKU label of each part as it comes in.
Every one of those screens listens for the same submit-on-Enter behavior. One DataWedge setting unlocks them all.
Common questions and snags
A few patterns we see when the verification step doesn’t behave:
Why does my Zebra scanner scan twice or send two Enters?
Two Enter mechanisms are on at once — Action key character is set to Carriage return AND a suffix (0x0D or Send ENTER key) is also configured in Basic Data Formatting. The second Enter fires on the next field and looks like the scanner is “double-tapping.” Pick one path and clear the other.
The scanner reads the barcode, but nothing lands in the field — why?
Either Keystroke output is disabled (the scan decodes but never types anywhere — check the toggle at the top of Step 4) or the label’s symbology decoder is off (walk back through Step 3 and re-enable Code 128, Code 39, QR, or Data Matrix as needed).
The settings look right, but nothing changed — what did I miss?
Usually one of two things: the browser was never associated with a custom profile (Step 2 — associate it with Chrome, or move the settings into Profile0 (default)), or Action key character is still set to None (Step 5 — it’s the most commonly missed setting on the page).
A third symptom looks identical but isn’t: if scans do submit yet characters go missing or arrive scrambled in a browser field, the suffix is fine and the output mode is the problem. That one has its own walkthrough — DataWedge in the browser: fix scans in a web app.
Not a Zebra? Datalogic and Honeywell
The idea is identical on any brand — append a carriage return so each scan submits itself; only the menu changes. On a Datalogic handheld (Memor, Skorpio), open the device’s scanner settings, switch on Keyboard Wedge on the Wedge screen, then set your carriage return as the Label suffix on the Formatting screen beside it. The exact path to those screens differs by model, so follow your handheld’s manual to reach the scanner settings. If a forum post sent you hunting for ScanWedge on a Datalogic, that is a name from other makers’ older handhelds — on a Datalogic, the Wedge screen is what you want. Honeywell handhelds carry the same suffix setting under their scanner settings. Once the suffix is in place, Ordovee behaves exactly as it does on a Zebra — scan, submit, next. And if the scanner in your hand is a plain USB or Bluetooth unit with no wedge app at all, the answer is usually still yes — will any barcode scanner work with web inventory? shows how to tell in thirty seconds.
Going further: per-profile setups for mixed devices
For shops running a mix of dedicated picking handhelds and shared-use devices, you can build multiple DataWedge profiles and let DataWedge route them by application. Ordovee-specific scanner behavior lives on the ODV profile (Enter suffix on, every decoder you care about enabled); other apps inherit Profile0 (default) with different settings.
The setup steps are identical — you just associate each profile with a different application package in Step 2 and tune the rest to taste.
→ Scans submitting but characters dropping in a browser field? DataWedge in the browser: fix scans in a web app → See the picking workflow this hardware setup powers: Scanner-first picking on the warehouse floor → Still choosing the hardware itself? What scanner and printer to buy for a parts operation → Buying the handheld secondhand? Which used Zebra to buy, and what to check first → Bringing ODV up for the first time? Order fulfillment in Ordovee — from order to doorstep walks the path orders take through the system. → Have a Zebra setup question we didn’t cover here? Let’s talk
See Ordovee in your operation.
The fastest way to know if ODV fits your shop is to see the workflow with your own data — no slides, no scripted demo.